Oracle Cloud Ampere
Guide brought to us by ENVY stake pool. Altered slightly to work with Armada Alliance docs, cntools and Stake pool operator scripts. This guide focuses on instance setup, building Cardano binaries for ARM and opening ports to your Oracle Ampere instance.
Setting up the ARM instance.
Make sure to pay close attention to get it right the first time! I had a rough time with customer support.
After setting up the free account it is important to upgrade it to a regular account. You will not be charged anything as long as you stay within the free tier. If you do not upgrade the account you run the risk of Oracle deleting your server. We have seen this happen a few times.
Set up an account with Oracle
Pay attention to any information regarding Ampere region availability. I used Osaka (availability of Ampere A.1 instances appears to vary depending on demand, so be aware availability by location will change over time).
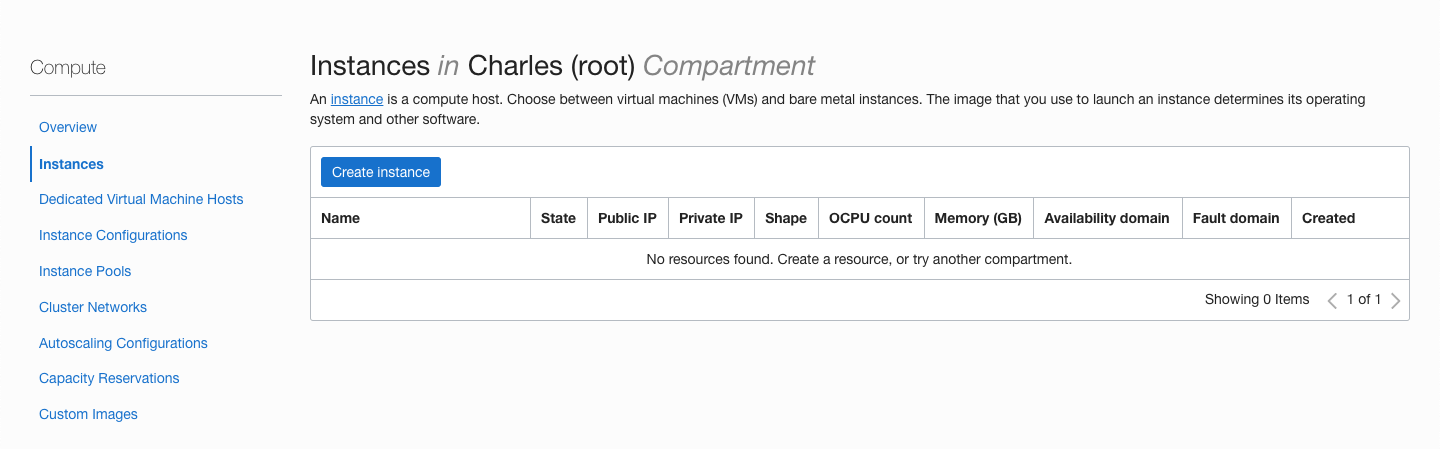
Create an Ampere A.1 Instance by doing the following:
Click 'Create Instance' on the dashboard.
Configure
The first input is the instance name. This is the hostname of the machine, use a FQDN if possible or leave it as is. You can always change the hostname from within Ubuntu at any time.
For placement create the instance in your root compartment. This is most likely already set but if it asks to set it choose the root compartment.
Click on 'Change image' and choose 'Canonical Ubuntu'.
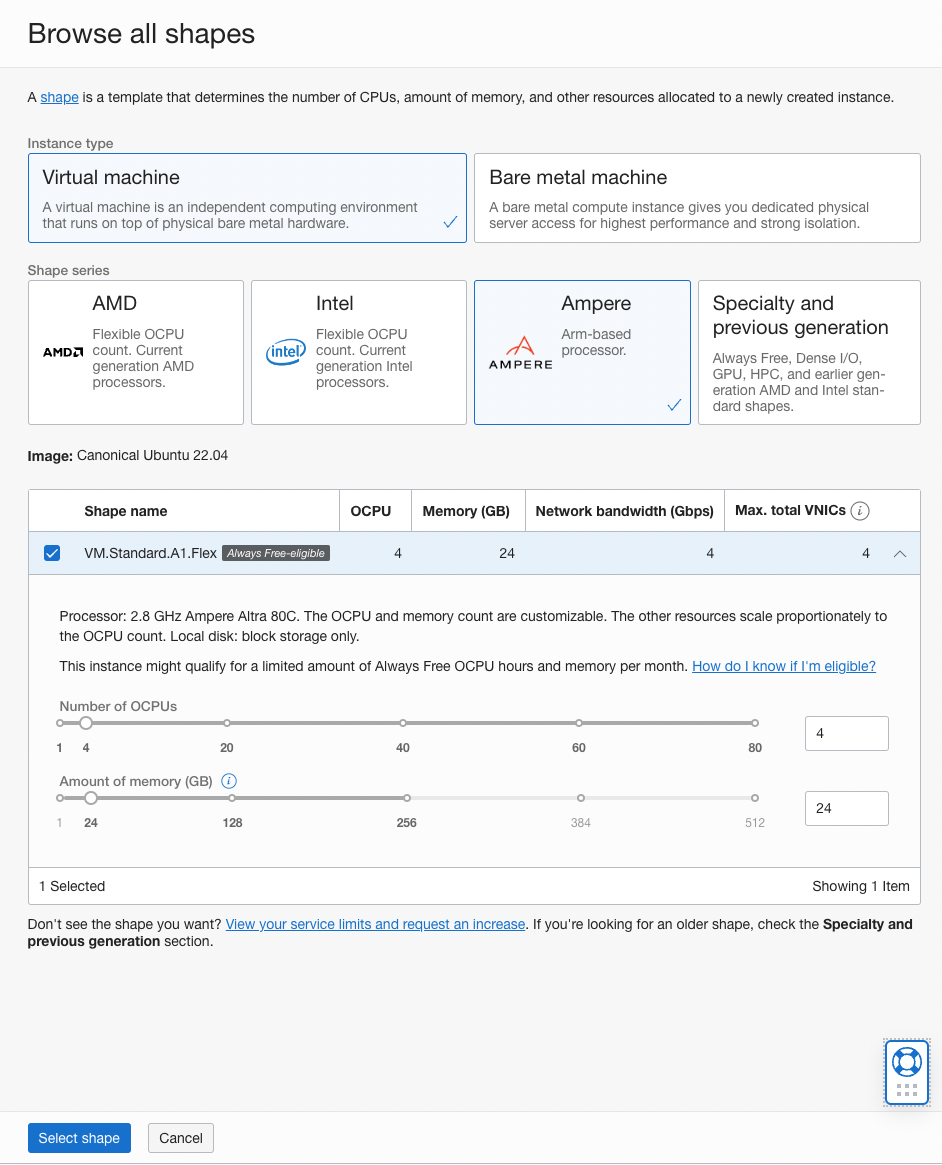
Go to 'Change shape' and choose 'Ampere' ARM-based processor then VM.Standard.A1.Flex shape. The always free tier allows for 4 OCPU's and 24gb of RAM. Anything more than that will incur a charge.
It is also possible to split the free tier into two servers (2 OCPU's/12gb RAM with a 100gb boot volume) but with the chain already 70gb's it is not recommended as you will soon run out of space on the boot volume. Also 4 OCPU's will sync up faster.
Leave the network section as is.
Under 'Add SSH Keys' choose 'Paste public keys' then paste your public ssh key into the 'SSH keys' input. If you need/want to create a new password protected ed25519 key pair you can. Give it a unique name.
Optionally create a new SSH key pair if needed
If you want to create a new SSH password protected ED25519 key pair.
ssh-keygen -a 64 -t ed25519 -f ~/.ssh/<unique_keyname>
-a rounds When saving a private key, this option specifies the number of KDF (key derivation function, currently bcrypt_pbkdf(3)) rounds used.
Higher numbers result in slower passphrase verification and increased resistance to brute-force password cracking (should the keys be stolen). The default is 16 rounds.
https://flak.tedunangst.com/post/new-openssh-key-format-and-bcrypt-pbkdf
Your new key pair will be located in ~/.ssh. Use cat to print out the key.
cd $HOME/.ssh
ls -al
cat <unique_keyname>.pub
Paste your public key into the input field.
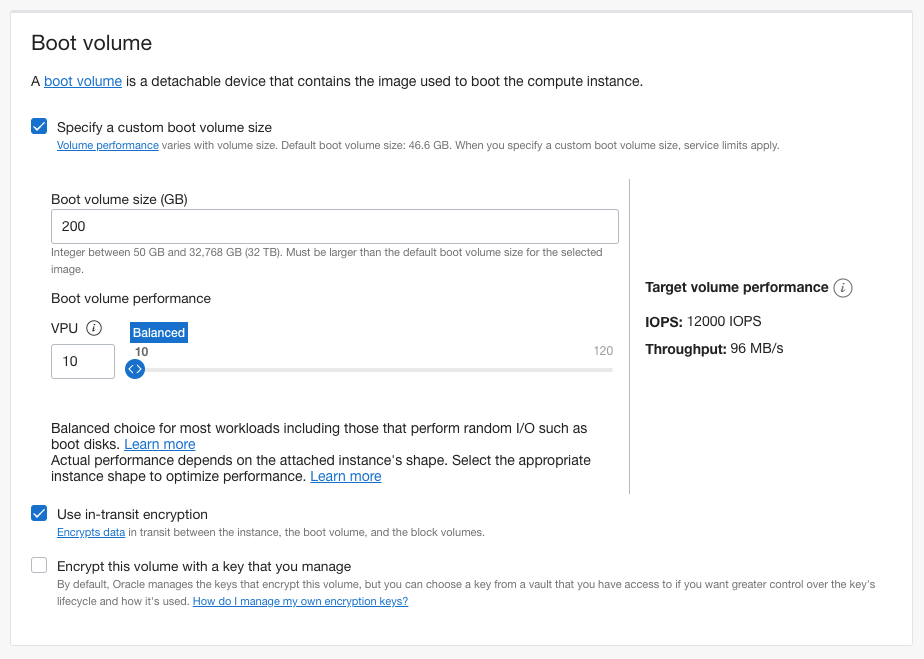
Under Boot volume section click on 'Specify a custom boot volume size' and enter 200gb.
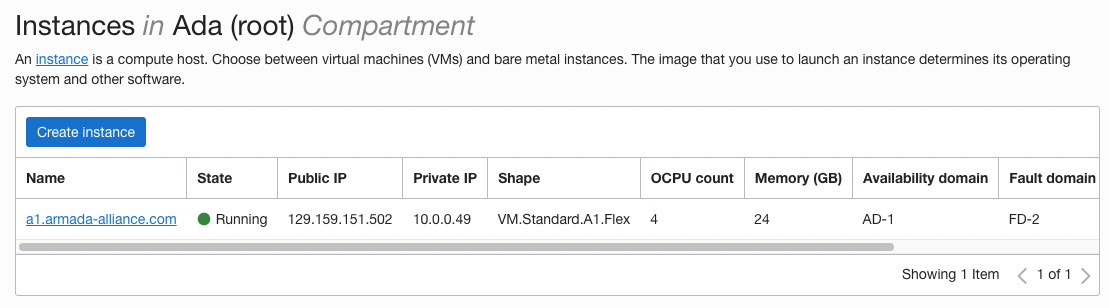
That's it go ahead and click 'Create' at the bottom left of the page. Provisioning the new instance will take a minute or two.
SSH into your new instance
Once the instance is created you will be presented with the instance details. Copy the 'Public IP address' under 'Instance access'. Open up a terminal and ssh into your new machine.
With MacOS you may have to specify which key to use with the -i flag and path to private key.
ssh ubuntu@<instance public ip> -i ~/.ssh/<unique_keyname>
Upgrade the system
sudo apt update;sudo apt upgrade -y
Install Packages to build and run cardano-node/cardano-cli.
sudo apt install build-essential libssl-dev tcptraceroute python3-pip flex \
    make automake unzip net-tools pkg-config g++ bison \
    libffi-dev libgmp-dev libssl-dev libtinfo-dev libsystemd-dev autoconf \
    zlib1g-dev libncursesw5 llvm-12 numactl libnuma-dev libtool -y
Chrony
We need to get our time synchronization as accurate as possible. Open /etc/chrony/chrony.conf
sudo apt install chrony
sudo nano /etc/chrony/chrony.conf
Replace the contents of the file with below, Save and exit.
pool time.google.com       iburst minpoll 2 maxpoll 2 maxsources 3 maxdelay 0.3
pool time.euro.apple.com   iburst minpoll 2 maxpoll 2 maxsources 3 maxdelay 0.3
pool time.apple.com        iburst minpoll 2 maxpoll 2 maxsources 3 maxdelay 0.3
pool ntp.ubuntu.com        iburst minpoll 2 maxpoll 2 maxsources 3 maxdelay 0.3

# This directive specify the location of the file containing ID/key pairs for
# NTP authentication.
keyfile /etc/chrony/chrony.keys

# This directive specify the file into which chronyd will store the rate
# information.
driftfile /var/lib/chrony/chrony.drift

# Uncomment the following line to turn logging on.
#log tracking measurements statistics

# Log files location.
logdir /var/log/chrony

# Stop bad estimates upsetting machine clock.
maxupdateskew 5.0

# This directive enables kernel synchronisation (every 11 minutes) of the
# real-time clock. Note that it can’t be used along with the 'rtcfile' directive.
rtcsync

# Step the system clock instead of slewing it if the adjustment is larger than
# one second, but only in the first three clock updates.
makestep 0.1 -1

# Get TAI-UTC offset and leap seconds from the system tz database
leapsectz right/UTC

# Serve time even if not synchronized to a time source.
local stratum 10
sudo service chrony restart
Optionally install ZRAM
ZRAM works incredibly well with both cardano-node and db-sync. ZRAM swap can absorb the brunt of running the internal leader log schedule. I highly recommend using it over disk swap and to save money.
sudo apt install linux-modules-extra-$(uname -r) zram-config
Open /usr/bin/init-zram-swapping.
sudo nano /usr/bin/init-zram-swapping
Switch compression algorithm to lz4. Multiply the default mem variable by 3 like below. This will give the instance 35gb of compressed virtual swap in RAM. Increase vm.swappiness to 150.
#!/bin/sh

modprobe zram

# Calculate memory to use for zram (1/2 of ram)
totalmem=`LC_ALL=C free | grep -e "^Mem:" | sed -e 's/^Mem: *//' -e 's/  *.*//'`
echo lz4 > /sys/block/zram0/comp_algorithm
mem=$((totalmem / 2 * 1024 * 3))

# initialize the devices
echo $mem > /sys/block/zram0/disksize
mkswap /dev/zram0
swapon -p 150 /dev/zram0
Build a static binary of jq
It's handy to have a statically linked aarch64 jq binary that you can move to an ARM cold machine.
A Raspberry Pi 400 makes a great cold machine for signing pool transactions or rotating KES. This allows you to have a truly never online cold machine, and it's fairly portable and compact.
cd $HOME/git
git clone https://github.com/stedolan/jq.git
cd jq/
git submodule update --init
autoreconf -fi
./configure --with-oniguruma=builtin
make LDFLAGS=-all-static
make check
sudo make install
Confirm.
jq -V
# jq-1.6-145-ga9f97e9-dirty
which jq
# /usr/local/bin/jq
Build Libsodium
This is IOHK's fork of Libsodium. It is needed for the dynamic build binary of cardano-node.
mkdir -p $HOME/git
cd $HOME/git
git clone https://github.com/input-output-hk/libsodium
cd libsodium
git checkout 66f017f1
./autogen.sh
./configure
make
sudo make install
Echo library paths into your .bashrc file and source it.
echo "export LD_LIBRARY_PATH="/usr/local/lib:$LD_LIBRARY_PATH"" >> ~/.bashrc
echo "export PKG_CONFIG_PATH="/usr/local/lib/pkgconfig:$PKG_CONFIG_PATH"" >> ~/.bashrc
. ~/.bashrc
Update link cache for shared libraries and confirm.
sudo ldconfig; ldconfig -p | grep libsodium
Build libsecp256k1
cd $HOME/git
git clone https://github.com/bitcoin-core/secp256k1.git
cd secp256k1
git reset --hard $SECP256K1_REF
./autogen.sh
./configure  --enable-module-schnorrsig --enable-experimental
make
sudo make install
Confirm linked secp256k1 library.
sudo ldconfig -p | grep secp256k1
GHCUP, GHC & Cabal
Install ghcup use defaults when asked.
curl --proto '=https' --tlsv1.2 -sSf https://get-ghcup.haskell.org | sh
. ~/.bashrc
ghcup upgrade
ghcup install cabal 3.6.2.0
ghcup set cabal 3.6.2.0

ghcup install ghc 8.10.7
ghcup set ghc 8.10.7
Confirm.
cabal --version
ghc --version
Build cardano-node
cd $HOME/git
git clone https://github.com/input-output-hk/cardano-node.git
cd cardano-node
git fetch --all --recurse-submodules --tags
git checkout $(curl -s https://api.github.com/repos/input-output-hk/cardano-node/releases/latest | jq -r .tag_name)
Configure with 8.10.7 set libsodium.
cabal configure -O0 -w ghc-8.10.7

echo -e "package cardano-crypto-praos\n flags: -external-libsodium-vrf" > cabal.project.local
sed -i $HOME/.cabal/config -e "s/overwrite-policy:/overwrite-policy: always/g"
rm -rf dist-newstyle/build/aarch64-linux/ghc-8.10.7
Build cardano-cli, cardano-node, cardano-submit-api and bech32.
If Ubuntu complains about LLVM try the below commands. This happened to me once. The library paths should be linked automatically though.
export PATH=/usr/lib/llvm-12/bin:$PATH
export CPLUS_INCLUDE_PATH=$(llvm-config --includedir):$CPLUS_INCLUDE_PATH
export LD_LIBRARY_PATH=$(llvm-config --libdir):$LD_LIBRARY_PATH
cabal build cardano-cli cardano-node cardano-submit-api bech32
Add them to your PATH.
- Stake Pool Scripts
- CNTools
mkdir -p ~/.local/bin
export PATH="$HOME/.local/bin:$PATH"
cp $(find $HOME/git/cardano-node/dist-newstyle/build -type f -name "cardano-cli") $HOME/.local/bin/
cp $(find $HOME/git/cardano-node/dist-newstyle/build -type f -name "cardano-node") $HOME/.local/bin/
cp $(find $HOME/git/cardano-node/dist-newstyle/build -type f -name "cardano-submit-api") $HOME/.local/bin/
cp $(find $HOME/git/cardano-node/dist-newstyle/build -type f -name "bech32") $HOME/.local/bin/
mkdir -p ~/.cabal/bin
export PATH="$HOME/.cabal/bin:$PATH"
cp $(find $HOME/git/cardano-node/dist-newstyle/build -type f -name "cardano-cli") $HOME/.cabal/bin/
cp $(find $HOME/git/cardano-node/dist-newstyle/build -type f -name "cardano-node") $HOME/.cabal/bin/
cp $(find $HOME/git/cardano-node/dist-newstyle/build -type f -name "cardano-submit-api") $HOME/.cabal/bin/
cp $(find $HOME/git/cardano-node/dist-newstyle/build -type f -name "bech32") $HOME/.cabal/bin/
Instance Firewall
Oracle Cloud images are incompatible with UFW, so we're going to go with firewalld instead, which is a firewall management solution available for many Linux distributions which acts as a frontend for the iptables packet filtering system provided by the Linux kernel (see https://www.digitalocean.com/community/tutorials/how-to-set-up-a-firewall-using-firewalld-on-centos-7).
Install Firewalld, enable the service to start on boot and start it now.
 sudo apt-get install firewalld
 sudo systemctl enable firewalld
 sudo systemctl start firewalld
Relay
Opening tcp port 6000. Permanent means it will be open after a reboot or Firewalld service restart.
sudo firewall-cmd --zone=public --add-port=6000/tcp --permanent
sudo firewall-cmd --reload
You can print a list of any Firewalld rules like so.
sudo firewall-cmd --list-all
Block producer
Open a port to a block producer only allowing connections from a specific IP address.
It is preferable to use a VPN like Wireguard to communicate with your other relays. Wireguard creates a network interface that you can control with Firewalld or UFW. Shaping which ports are opened or allowing one way traffic. Please see our Wireguard guide for setup.
sudo firewall-cmd --permanent --zone=public --add-rich-rule='rule family="ipv4" source address="<your ip address>" port protocol="tcp" port="6002" accept'

#Reload firewalld
sudo firewall-cmd --reload

#Verify the rich rule was added
sudo firewall-cmd --list-all
Oracle Ingress
Open relay
Log into Oracle Cloud and click on your instance name link.
On the next page under instance details click on the 'Virtual cloud network' link.
Click on the existing subnet.

Click into the existing security list.
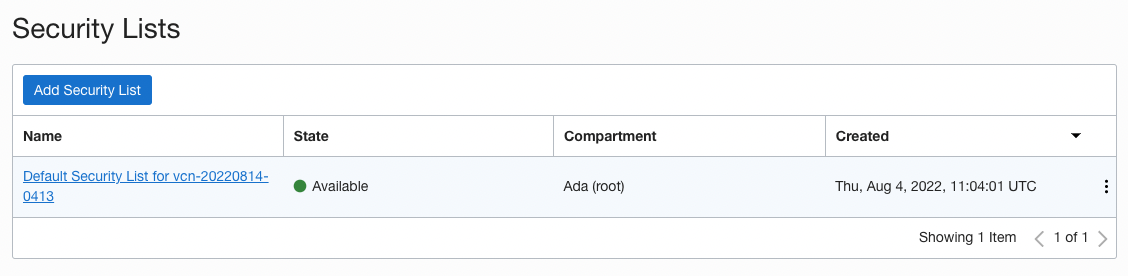
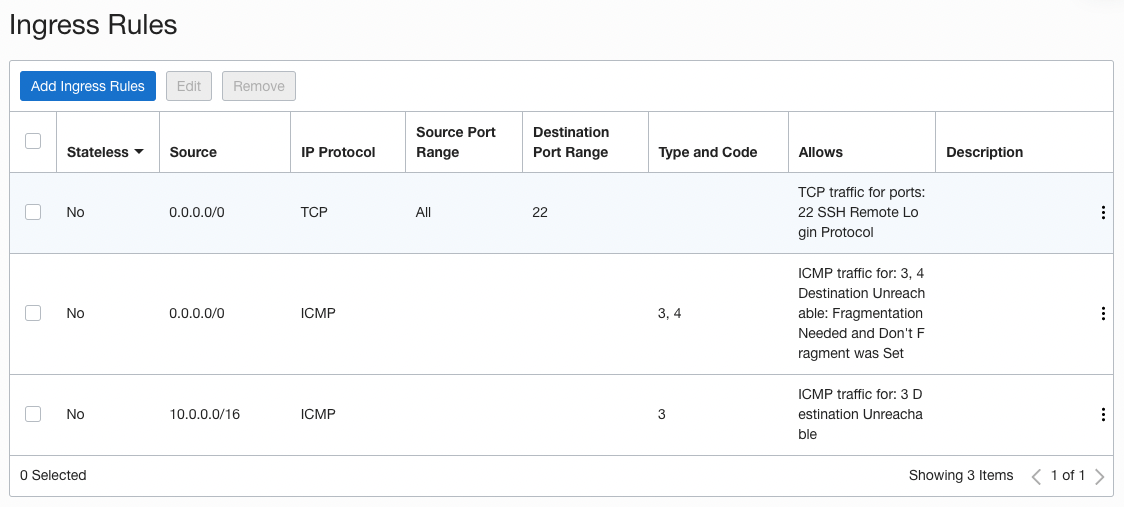
You will be presented with the default ingress rules. Click 'Add Ingress Rules'.
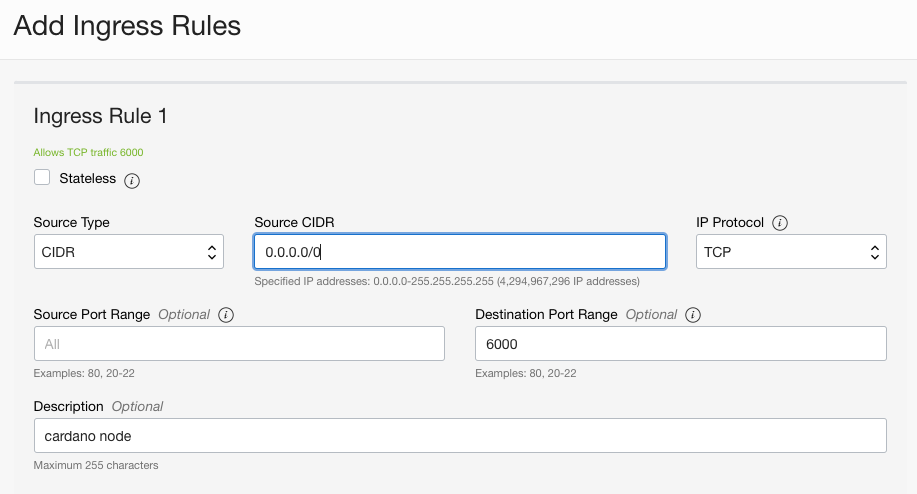
Make it look like below for a relay running on port 6000.
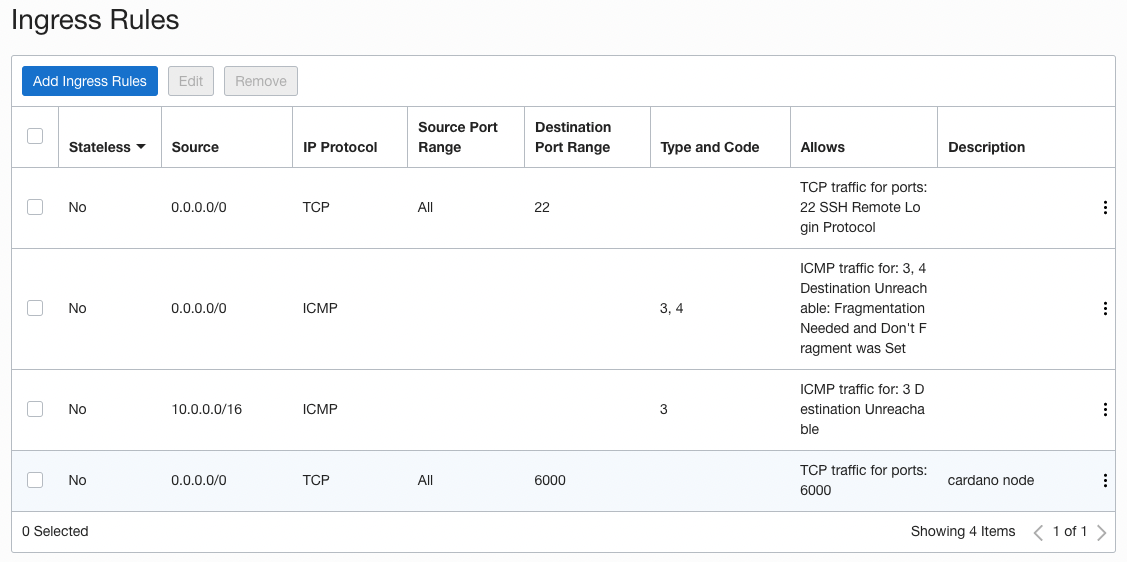
It should look like this.
Your Oracle instance should now have everything you need to set up a relay or block producer with CNTools or Stake Pool Operator scripts. If using CNTools just be aware that the prebuilt binaries the prerequisites script downloads are x86 binaries. CNTools will not overwrite any existing aarch64 binaries. If you have any questions you can ask in our Telegram group.