Environment Setup
There is a 500 ₳ Registration deposit and another 5 ₳ in registration costs to start a pool on mainnet. First time users are strongly recommended to use testnet. You can get tada (test ada) from the testnet faucet. Testnet ADA faucet link
Create the directories for our project.
mkdir -p ${HOME}/.local/bin
mkdir -p ${HOME}/pi-pool/files
mkdir -p ${HOME}/pi-pool/scripts
mkdir -p ${HOME}/pi-pool/logs
mkdir ${HOME}/git
mkdir ${HOME}/tmp
Create an .adaenv file, choose which network you want to be on and source the file. This file will hold the variables/settings for operating a Pi-Node. /home/ada/.adaenv
echo -e NODE_CONFIG=mainnet >> ${HOME}/.adaenv; source ${HOME}/.adaenv
Create bash variables & add ~/.local/bin to our $PATH 🏃
You must reload environment files after updating them. Same goes for cardano-node, changes to the topology or config files require a cardano-service restart.
echo . ~/.adaenv >> ${HOME}/.bashrc
cd .local/bin; echo "export PATH=\"$PWD:\$PATH\"" >> $HOME/.adaenv
echo export NODE_HOME=${HOME}/pi-pool >> ${HOME}/.adaenv
echo export NODE_PORT=3003 >> ${HOME}/.adaenv
echo export NODE_FILES=${HOME}/pi-pool/files >> ${HOME}/.adaenv
echo export TOPOLOGY='${NODE_FILES}'/topology.json >> ${HOME}/.adaenv
echo export DB_PATH='${NODE_HOME}'/db >> ${HOME}/.adaenv
echo export CONFIG='${NODE_FILES}'/config.json >> ${HOME}/.adaenv
echo export CARDANO_NODE_SOCKET_PATH="${HOME}/pi-pool/db/socket" >> ${HOME}/.adaenv
source ${HOME}/.bashrc; source ${HOME}/.adaenv
Build Libsodium
This is Intersect's fork of Libsodium. It is needed for the dynamic build binary of cardano-node.
cd; cd git/
git clone https://github.com/IntersectMBO/libsodium
cd libsodium
git checkout 66f017f1
./autogen.sh
./configure
make
sudo make install
Echo library paths into .bashrc file and source it.
echo "export LD_LIBRARY_PATH="/usr/local/lib:$LD_LIBRARY_PATH"" >> ~/.bashrc
echo "export PKG_CONFIG_PATH="/usr/local/lib/pkgconfig:$PKG_CONFIG_PATH"" >> ~/.bashrc
. ~/.bashrc
Update link cache for shared libraries and confirm.
sudo ldconfig; ldconfig -p | grep libsodium
Build secp256k1
cd; cd git/
git clone https://github.com/bitcoin-core/secp256k1.git
cd secp256k1
git reset --hard $SECP256K1_REF
./autogen.sh
./configure  --enable-module-schnorrsig --enable-experimental
make
sudo make install
Update link cache for shared libraries and confirm.
sudo ldconfig; ldconfig -p | grep secp256k1
Build a static binary of jq
It's handy to have a statically linked aarch64 jq binary that you can move to an ARM cold machine.
A Raspberry Pi 400 makes a great cold machine for signing pool transactions or rotating KES. This allows you to have a truly never online cold machine, and it's fairly portable and compact.
cd $HOME/git
git clone https://github.com/stedolan/jq.git
cd jq/
git submodule update --init
autoreconf -fi
./configure --with-oniguruma=builtin
make LDFLAGS=-all-static
make check
sudo make install
Confirm.
jq -V
# jq-1.6-145-ga9f97e9-dirty
which jq
# /usr/local/bin/jq
Download latest config files
cd $NODE_FILES
wget -N https://book.world.dev.cardano.org/environments/mainnet/config.json
wget -N https://book.world.dev.cardano.org/environments/mainnet/byron-genesis.json
wget -N https://book.world.dev.cardano.org/environments/mainnet/shelley-genesis.json
wget -N https://book.world.dev.cardano.org/environments/mainnet/alonzo-genesis.json
wget -N https://book.world.dev.cardano.org/environments/mainnet/topology.json
wget -N https://book.world.dev.cardano.org/environments/mainnet/submit-api-config.json
wget -N https://book.world.dev.cardano.org/environments/mainnet/conway-genesis.json
Run the following to modify config.json and update TraceBlockFetchDecisions to "true" & listen on all interfaces with Prometheus Node Exporter.
sed -i config.json \
    -e "s/TraceBlockFetchDecisions\": false/TraceBlockFetchDecisions\": true/g" \
    -e "s/127.0.0.1/0.0.0.0/g"
Retrieve aarch64 1.33.1 and cardano-submit-api binaries
The unofficial static cardano-node, cardano-cli and cardano-submit-api binaries available to us are being built by an IOHK engineer in his spare time. Consider delegating to zw3rk pool to support mobile Haskel development.
The unofficial dynamic cardano-node, cardano-cli and cardano-submit-api binaries available to us are being built by ADASRN in his spare time. Consider delegating to SRN pool to support.
All previous and future aarch64 binaries can be found in the Binary repository.
The manual commands
cd ${HOME}/tmp
wget -O 1_35_4.zip https://github.com/armada-alliance/cardano-node-binaries/blob/main/static-binaries/1_35_4.zip?raw=true
unzip *.zip
mv cardano-*/cardano-* ${HOME}/.local/bin
rm -r cardano*
cd ${HOME}
If binaries already exist (if updating) you will have to confirm overwriting the old ones.
Confirm binaries are in $USER's $PATH & desired version.
cardano-node version
cardano-cli version
Systemd unit startup scripts
Create the systemd unit file and startup script so systemd can manage cardano-node.
nano ${HOME}/.local/bin/cardano-service
Paste the following, save & exit.
#!/bin/bash
. /home/ada/.adaenv

## +RTS -N4 -RTS = Multicore(4)
cardano-node run +RTS -N4 -RTS \
  --topology ${TOPOLOGY} \
  --database-path ${DB_PATH} \
  --socket-path ${CARDANO_NODE_SOCKET_PATH} \
  --port ${NODE_PORT} \
  --config ${CONFIG}
Allow execution of our new cardano-node service file.
chmod +x ${HOME}/.local/bin/cardano-service
Open /etc/systemd/system/cardano-node.service.
sudo nano /etc/systemd/system/cardano-node.service
Paste the following, You will need to edit the username here if you chose to not use ada. Save & exit.
# The Cardano Node Service (part of systemd)
# file: /etc/systemd/system/cardano-node.service

[Unit]
Description     = Cardano node service
Wants           = network-online.target
After           = network-online.target

[Service]
User            = ada
Type            = simple
WorkingDirectory= /home/ada/pi-pool
ExecStart       = /bin/bash -c "PATH=/home/ada/.local/bin:$PATH exec /home/ada/.local/bin/cardano-service"
KillSignal=SIGINT
RestartKillSignal=SIGINT
TimeoutStopSec=50
LimitNOFILE=32768
Restart=always
RestartSec=50
EnvironmentFile=-/home/ada/.adaenv

[Install]
WantedBy= multi-user.target
Create the systemd unit file and startup script so systemd can manage cardano-submit-api.
nano ${HOME}/.local/bin/cardano-submit-service
#!/bin/bash
. /home/ada/.adaenv

cardano-submit-api \
  --socket-path ${CARDANO_NODE_SOCKET_PATH} \
  --port 8090 \
  --config /home/ada/pi-pool/files/tx-submit-mainnet-config.yaml \
  --listen-address 0.0.0.0 \
  --mainnet
Allow execution of our new cardano-submit-api service script.
chmod +x ${HOME}/.local/bin/cardano-submit-service
Create /etc/systemd/system/cardano-submit.service.
sudo nano /etc/systemd/system/cardano-submit.service
Paste the following, You will need to edit the username here if you chose to not use ada. save & exit.
# The Cardano Submit Service (part of systemd)
# file: /etc/systemd/system/cardano-submit.service

[Unit]
Description     = Cardano submit service
Wants           = network-online.target
After           = network-online.target

[Service]
User            = ada
Type            = simple
WorkingDirectory= /home/ada/pi-pool
ExecStart       = /bin/bash -c "PATH=/home/ada/.local/bin:$PATH exec /home/ada/.local/bin/cardano-submit-service"
KillSignal=SIGINT
RestartKillSignal=SIGINT
TimeoutStopSec=10
LimitNOFILE=32768
Restart=always
RestartSec=10
EnvironmentFile=-/home/ada/.adaenv

[Install]
WantedBy= multi-user.target
Reload systemd so it picks up our new service files.
sudo systemctl daemon-reload
Let's add a couple functions to the bottom of our .adaenv file to make life a little easier.
nano ${HOME}/.adaenv
cardano-service() {
    #do things with parameters like $1 such as
    sudo systemctl "$1" cardano-node.service
}

cardano-submit() {
    #do things with parameters like $1 such as
    sudo systemctl "$1" cardano-submit.service
}
Save & exit.
source ${HOME}/.adaenv
What we just did there was add a couple functions to control our cardano-service and cardano-submit without having to type out
sudo systemctl enable cardano-node.service
sudo systemctl start cardano-node.service
sudo systemctl stop cardano-node.service
sudo systemctl status cardano-node.service
Now we just have to:
- cardano-service enable (enables cardano-node.service auto start at boot)
- cardano-service start (starts cardano-node.service)
- cardano-service stop (stops cardano-node.service)
- cardano-service status (shows the status of cardano-node.service)
Or
- cardano-submit enable (enables cardano-submit.service auto start at boot)
- cardano-submit start (starts cardano-submit.service)
- cardano-submit stop (stops cardano-submit.service)
- cardano-submit status (shows the status of cardano-submit.service)
The submit service listens on port 8090. You can connect your Nami wallet like below to submit tx's yourself in Nami's settings.
http://<node lan ip>:8090/api/submit/tx
⛓ Syncing the chain ⛓
Manually syncing the chain with Raspberry Pi takes forever(days) and the chain is constantly growing about 80gb as of this update to the docs. We host snapshots that you can download that will greatly reduce time to synced node.
Download snapshot
This service is provided as is. It is up to you. If you want to sync the chain on your own simply:
cardano-service enable
cardano-service start
cardano-service status
Once done, enable & start cardano-node.
cardano-service enable
cardano-service start
cardano-service status
Be sure your node is not running & delete the db folder if it exists and download db/.
cardano-service stop
cd $NODE_HOME
rm -r db/
You can get a good snapshot for mainnet here.
Once wget completes enable & start cardano-node.
cardano-service enable
cardano-service start
cardano-service status
gLiveView.sh
Guild operators scripts has a couple useful tools for operating a pool. We do not want the project as a whole, though there are a couple scripts we are going to use.
cd $NODE_HOME/scripts
wget https://raw.githubusercontent.com/cardano-community/guild-operators/master/scripts/cnode-helper-scripts/env
wget https://raw.githubusercontent.com/cardano-community/guild-operators/master/scripts/cnode-helper-scripts/gLiveView.sh
You can change the port cardano-node runs on in the .adaenv file in your home directory. Open the file edit the port number. Load the change into your shell & restart the cardano-node service.
nano /home/ada/.adaenv
source /home/ada/.adaenv
cardano-service restart
Add a line sourcing our .adaenv file to the top of the env file and adjust some paths.
sed -i env \
    -e "/#CNODEBIN/i. ${HOME}/.adaenv" \
    -e "s/\#CNODE_HOME=\"\/opt\/cardano\/cnode\"/CNODE_HOME=\"\${HOME}\/pi-pool\"/g" \
    -e "s/\#CNODE_PORT=6000"/CNODE_PORT=\"'${NODE_PORT}'\""/g" \
    -e "s/\#CONFIG=\"\${CNODE_HOME}\/files\/config.json\"/CONFIG=\"\${NODE_FILES}\config.json\"/g" \
    -e "s/\#TOPOLOGY=\"\${CNODE_HOME}\/files\/topology.json\"/TOPOLOGY=\"\${NODE_FILES}\topology.json\"/g" \
    -e "s/\#LOG_DIR=\"\${CNODE_HOME}\/logs\"/LOG_DIR=\"\${CNODE_HOME}\/logs\"/g"
Allow execution of gLiveView.sh.
chmod +x gLiveView.sh
topologyUpdater.sh
Until peer to peer is enabled on the network operators need a way to get a list of relays/peers to connect to. The topology updater service runs in the background with cron. Every hour the script will run and tell the service you are a relay and want to be a part of the network. It will add your relay to it's directory after four hours you should see in connections in gLiveView.
The list generated will show you the distance & a clue as to where the relay is located.
Download the topologyUpdater script and have a look at it. Lower the number of peers to 10 and add any custom peers you wish. These are outgoing connections. You will not see any incoming transactions untill other nodes start connecting to you.
wget https://raw.githubusercontent.com/cardano-community/guild-operators/master/scripts/cnode-helper-scripts/topologyUpdater.sh
Lower the number of MX_PEERS to 10.
nano topologyUpdater.sh
Save, exit and make it executable.
chmod +x topologyUpdater.sh
You will not be able to successfully execute ./topologyUpdater.sh until you are fully synced up to the tip of the chain.
Create a cron job that will run the script every hour.
crontab -e
Choose nano when prompted for editor.
Add the following to the bottom, save & exit.
The Pi-Node image has this cron entry disabled by default. You can enable it by removing the #.
SHELL=/bin/bash
PATH=/home/ada/.local/bin:/usr/bin:/bin:/usr/sbin:/sbin:/usr/local/bin
33 * * * * . $HOME/.adaenv; $HOME/pi-pool/scripts/topologyUpdater.sh
After four hours you can open ${NODE_CONFIG}-topology.json and inspect the list of out peers the service suggested for you. Remove anything more than 7k distance(or less). IOHK recently suggested 8 out peers. The more out peers the more system resources it uses. You can also add any peers you wish to connect to manualy inside the script. This is where you would add your block producer or any friends nodes.
nano $NODE_FILES/${NODE_CONFIG}-topology.json
You can use gLiveView.sh to view ping times in relation to the peers in your ${NODE_CONFIG}-topology file. Use Ping to resolve hostnames to IP's.
Changes to this file will take affect upon restarting the cardano-service.
Don't forget to remove the last comma in your topology file!
Status should show as enabled & running.
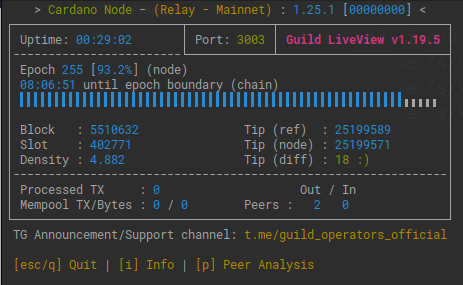
Once your node syncs past epoch 208(shelley era) you can use gLiveView.sh to monitor your sync progress.
It can take over an hour for cardano-node to sync to the tip of the chain. Use ./gliveView.sh, htop and log outputs to view process. Be patient it will come up.
cd $NODE_HOME/scripts
./gLiveView.sh
Prometheus, Node Exporter & Grafana
Prometheus connects to cardano-nodes backend and serves metrics over http. Grafana in turn can use that data to display graphs and create alerts. Our Grafana dashboard will be made up of data from our Ubuntu system & cardano-node. Grafana can display data from other sources as well, like adapools.org.
You can connect a Telegram bot to Grafana which can alert you of problems with the server. Much easier than trying to configure email alerts.
Install Prometheus & Node Exporter.
Prometheus can scrape the http endpoints of other servers running node exporter. Meaning Grafana and Prometheus does not have to be installed on your core and relays. Only the package prometheus-node-exporter is required if you would like to build a central Grafana dashboard for the pool, freeing up resources and having a single dashboard to monitor everything.
sudo apt install prometheus prometheus-node-exporter -y
Disable them in systemd for now.
sudo systemctl disable prometheus.service
sudo systemctl disable prometheus-node-exporter.service
Configure Prometheus
Open prometheus.yml.
sudo nano /etc/prometheus/prometheus.yml
Replace the contents of the file with.
Indentation must be correct YAML format or Prometheus will fail to start.
global:
  scrape_interval: 15s # By default, scrape targets every 15 seconds.

  # Attach these labels to any time series or alerts when communicating with
  # external systems (federation, remote storage, Alertmanager).
  external_labels:
    monitor: "codelab-monitor"

# A scrape configuration containing exactly one endpoint to scrape:
# Here it's Prometheus itself.
scrape_configs:
  # The job name is added as a label job=<job_name> to any timeseries scraped from this config.
  - job_name: "prometheus" # To scrape data from Prometheus Node Exporter
    scrape_interval: 5s
    static_configs:
      #      - targets: ['<CORE PRIVATE IP>:12798']
      #        labels:
      #          alias: 'C1'
      #          type:  'cardano-node'
      #      - targets: ['<RELAY PRIVATE IP>:12798']
      #        labels:
      #          alias: 'R1'
      #          type:  'cardano-node'
      - targets: ["localhost:12798"]
        labels:
          alias: "N1"
          type: "cardano-node"

      #      - targets: ['<CORE PRIVATE IP>:9100']
      #        labels:
      #          alias: 'C1'
      #          type:  'node'
      #      - targets: ['<RELAY PRIVATE IP>:9100']
      #        labels:
      #          alias: 'R1'
      #          type:  'node'
      - targets: ["localhost:9100"]
        labels:
          alias: "N1"
          type: "node"
Save & exit.
Start Prometheus.
sudo systemctl start prometheus.service
Install Grafana
Add Grafana's gpg key to Ubuntu.
sudo su
wget -O- https://packages.grafana.com/gpg.key | gpg --dearmor | sudo tee /usr/share/keyrings/grafana-archive-keyring.gpg
Add latest stable repo to apt sources.
echo "deb [arch=arm64 signed-by=/usr/share/keyrings/grafana-archive-keyring.gpg] https://apt.grafana.com stable main" | sudo tee -a /etc/apt/sources.list.d/grafana.list
Update your package lists & install Grafana.
sudo apt update; sudo apt install grafana
Change the port Grafana listens on so it does not clash with cardano-node.
sudo sed -i /etc/grafana/grafana.ini \
         -e "s#;http_port#http_port#" \
         -e "s#3000#5000#"
Start Grafana
sudo systemctl start grafana-server.service
Cardano-monitor bash function
Open .adaenv
cd ${HOME}; nano .adaenv
Down at the bottom add.
cardano-monitor() {
    #do things with parameters like $1 such as
    sudo systemctl "$1" prometheus.service
    sudo systemctl "$1" prometheus-node-exporter.service
    sudo systemctl "$1" grafana-server.service
}
Save, exit & source.
source .adaenv
Here we tied all three services under one function. Enable Prometheus.service, prometheus-node-exporter.service & grafana-server.service to run on boot and start the services.
cardano-monitor enable
cardano-monitor start
At this point you may want to start cardano-service and get synced up before we continue to configure Grafana. Go to the syncing the chain section. Choose whether you want to wait 30 hours or download the latest chain snapshot. Return here once gLiveView.sh shows you are at the tip of the chain.
Grafana, Nginx proxy_pass & snakeoil
Let's put Grafana behind Nginx with self signed(snakeoil) certificate. The certificate was generated when we installed the ssl-cert package.
You will get a warning from your browser. This is because ca-certificates cannot follow a trust chain to a trusted (centralized) source. The connection is however encrypted and will protect your passwords flying around in plain text.
sudo nano /etc/nginx/sites-available/default
Replace contents of the file with below.
# Default server configuration
#
server {
        listen 80 default_server;
        return 301 https://$host$request_uri;
}

server {
        # SSL configuration
        #
        listen 443 ssl default_server;
        #listen [::]:443 ssl default_server;
        #
        # Note: You should disable gzip for SSL traffic.
        # See: https://bugs.debian.org/773332
        #
        # Read up on ssl_ciphers to ensure a secure configuration.
        # See: https://bugs.debian.org/765782
        #
        # Self signed certs generated by the ssl-cert package
        # Don't use them in a production server!
        #
        include snippets/snakeoil.conf;

        add_header X-Proxy-Cache $upstream_cache_status;
        location / {
          proxy_pass http://127.0.0.1:5000;
          proxy_redirect      off;
          include proxy_params;
        }
}
Check that Nginx is happy with our changes and restart it.
sudo nginx -t
## if ok, do
sudo service nginx restart
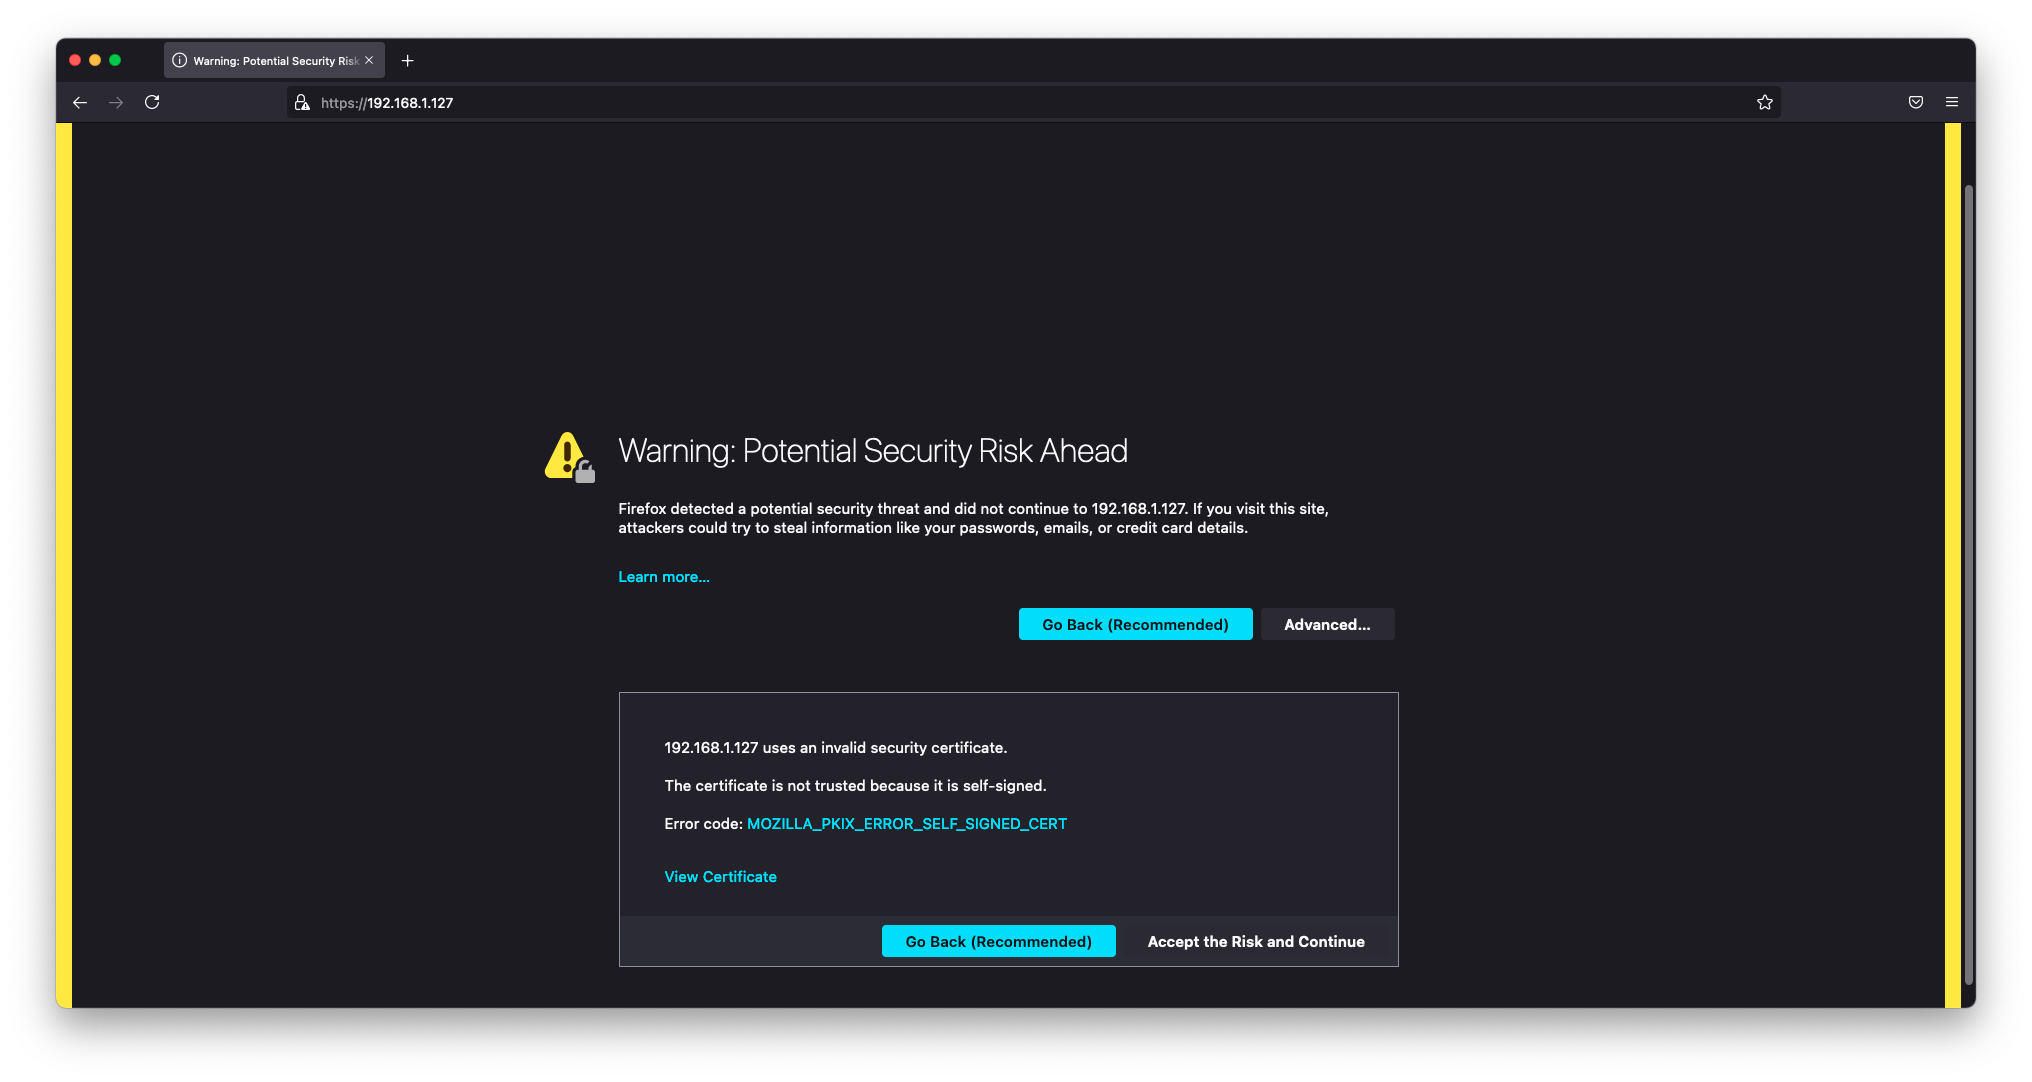
You can now visit your pi-nodes ip address without any port specification, the connection will be upgraded to SSL/TLS and you will get a scary message(not really scary at all). Continue through to your dashboard.
Configure Grafana
On your local machine open your browser and enter your nodes private ip address.
Log in and set a new password. Default username and password is admin:admin.
Configure data source
In the left hand vertical menu go to Configure > Datasources and click to Add data source. Choose Prometheus. Enter http://localhost:9090 where it is grayed out, everything else can be left default. At the bottom save & test. You should get the green "Data source is working" if cardano-monitor has been started. If for some reason those services failed to start issue cardano-service restart.
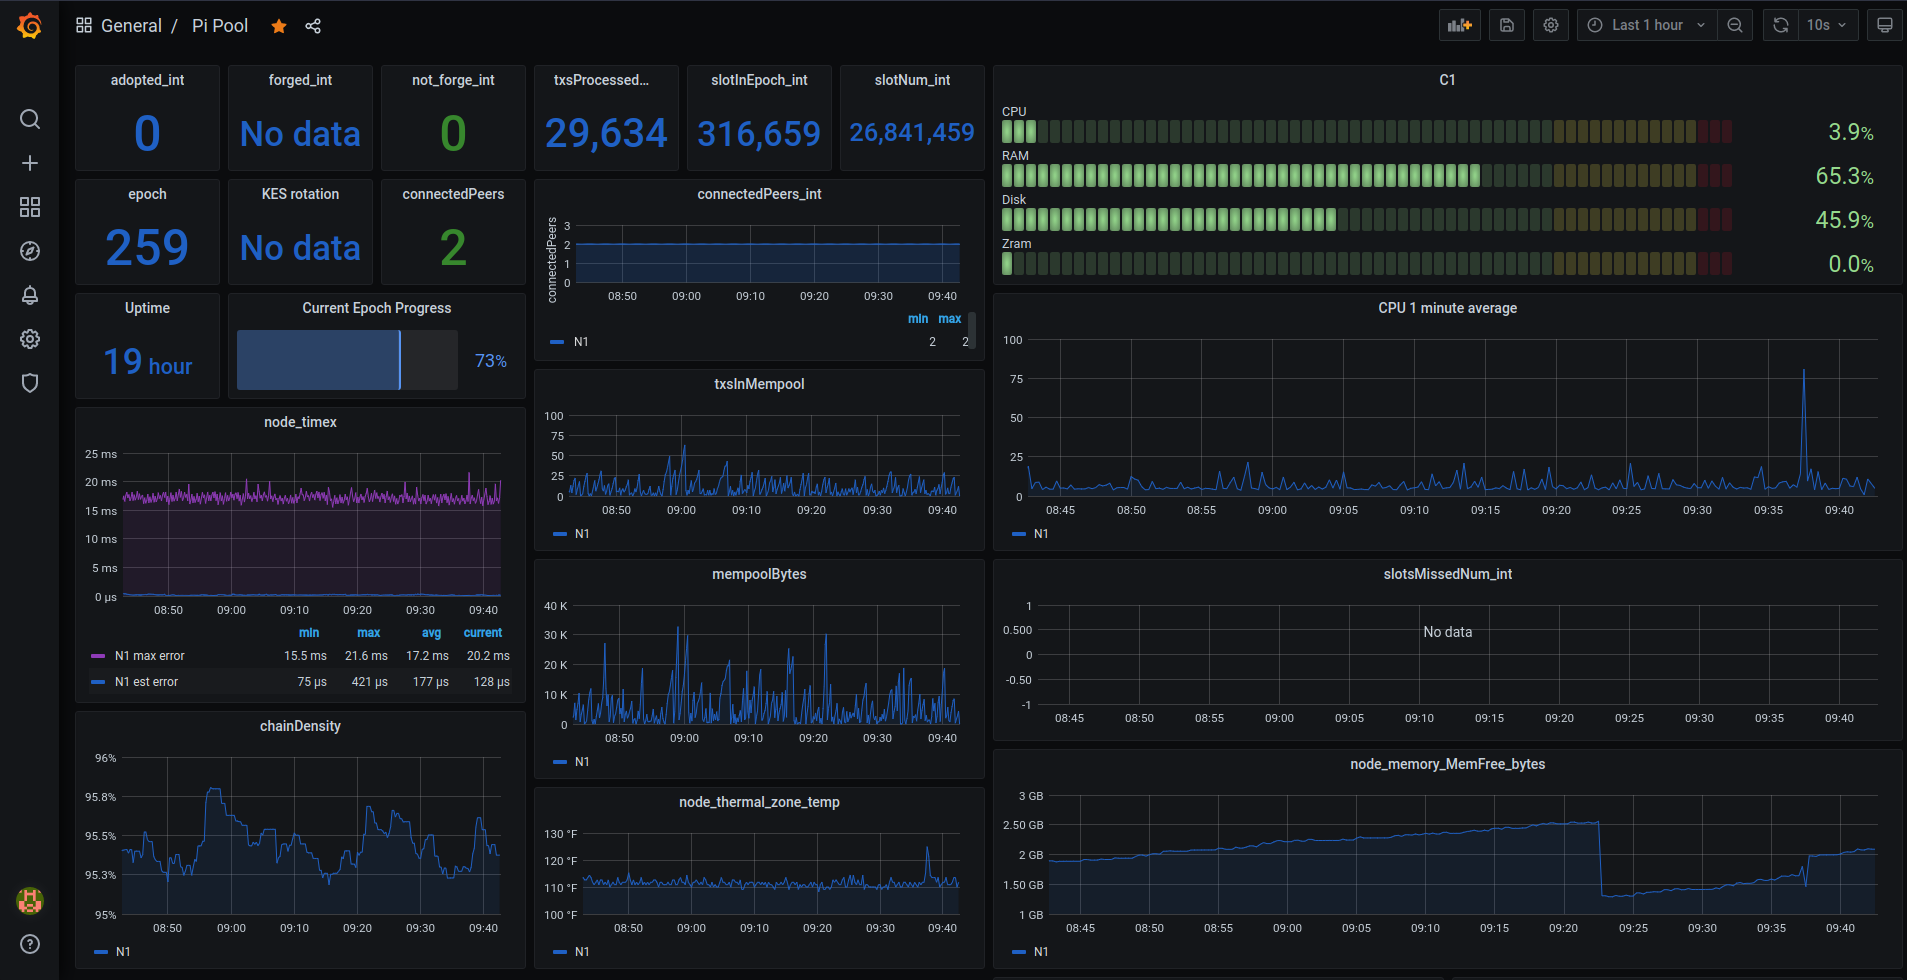
Import dashboards
Save the dashboard json files to your local machine.
In the left hand vertical menu go to Dashboards > Manage and click on Import. Select the file you just downloaded/created and save. Head back to Dashboards > Manage and click on your new dashboard.
Configure poolDataLive
Here you can use the poolData api to bring extra pool data into Grafana like stake & price.
Follow the instructions to install the Grafana plugin, configure your datasource and import the dashboard.
Useful Commands
View how much zram swap cardano-node is using.
CNZRAM=$(pidof cardano-node)
grep --color VmSwap /proc/$CNZRAM/status
Follow log output to journal.
sudo journalctl --unit=cardano-node --follow
Follow log output to stdout.
sudo tail -f /var/log/syslog
View network connections with netstat.
sudo netstat -puntw
From here you have a Pi-Node with tools to build an active relay or a stake pool from the following pages. Best of luck and please join the armada-alliance, together we are stronger! 💪