Introduction
Now that everything is set up let's start creating the pool. Please read the official documentation Martin of ATADA pool provides to get a better understanding of the scripts. His tutorial is much more detailed and covers a lot of options. Thank you Martin!
This tutorial on the other hand is for the basics. It contains everything necessary to get a stake pool running and some other fundamental operations. It should help to get a nice and easy workflow.
The transfer with the USB device is fully automated. It just needs to be mounted at the current working environment,
which should also work automated.
If not, mount it with sudo mount ~/usb_transfer. Make sure to unmount every time before removing sudo umount ~/usb_transfer.
This guide assumes, that you are always in $HOME/pool_keys when running a script on the offline machine and in $HOME/pi-pool on the core.
Prerequisits on the cold machine
Let's begin with a directory for your keys.
cd
mkdir pool_keys
cd pool_keys
Also make sure the offline machine's time is correct, you'll have to do this everytime you use it!
timedatectl
timedatectl set-time xxxxx
Create a stake pool
Basically everything is created offline. Make sure that you never expose your secret keys to an online environment and back them up, multiple times best case. The only keys you need on your core are: kes-xxx.skey, vrf.skey and node-xxx.opcert.
Workflow
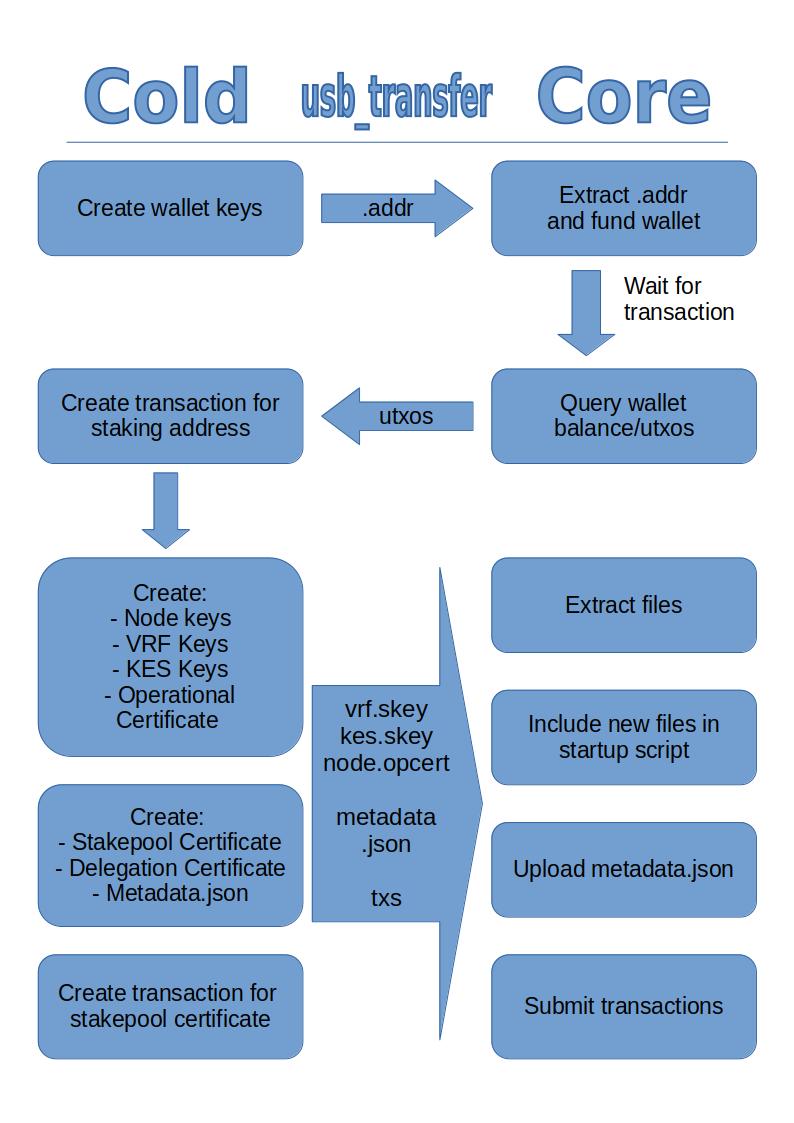
Create and fund a wallet
First of all you'll need a wallet and with it a staking key. Create the keys and name the wallet accordingly.
- offline
03a_genStakingPaymentAddr.sh wallet_name cli
Now copy the addresses to your core to fund the new wallet. You'll need your fresh USB drive for that.
- offline
01_workOffline.sh attach wallet_name.payment.addr
01_workOffline.sh attach wallet_name.staking.addr
Switch the USB drive from offline to online machine. Extract the address files.
- core
01_workOffline.sh extract
Retrieve the address and send some funds to your new wallet. You'll need at least 502 ADA + tx fees + your pledge.
- core
cat wallet_name.payment.addr
Query the balance and wait until the new UTXO shows up.
- core
01_queryAddress.sh wallet_name.payment
When the funds arrived copy the UTXO data to your offline machine.
- core
01_workOffline.sh add wallet_name.payment
Generate a transaction to register the staking address. It will be submitted later on.
- offline
03b_regStakingAddrCert.sh wallet_name.staking
Create the pool's keys and certificates
Generate the keys for your core node.
- offline
04a_genNodeKeys.sh pool_name cli
04b_genVRFKeys.sh pool_name
04c_genKESKeys.sh pool_name
04d_genNodeOpCert.sh pool_name
Generate your stakepool certificate and metadata.json.
- offline
05a_genStakepoolCert.sh pool_name
This creates a pool_name.pool.json file, which you can edit according to your needs and wishes.
Everything is calculated in lovelaces. (Reminder: 1 ADA = 1,000,000 lovelace)
So in this case we get a pool with 100k ADA pledge, 340 ADA fixed cost (minimum) and 1% margin.
Add as many of your relays as you want. Either ip or dns based.
Pool description can contain up to 255 characters.
poolMetaUrl points to the Metadata file, which you need to upload later. Github is a popular choice, if you don't want to use your own server.
poolMetaUrl can only be 64 characters long.
Make sure it points to the raw file.
In case you need to shorten the URL you can do it by creating an empty pool_name.metadata.json, upload it
and shorten the URL. Make sure the short URL doesn't expire. Later replace it with the actual file.
You may also add an URL to an extended.metadata.json, which holds more information like the URL to your logo etc.
Just create the file on your local machine, it's quite self-explanatory.
The png icon is limited to 64x64 while the logo could use 400x400 pixels. jpg works aswell.
- pool_name.pool.json
- extended.metadata.json
{
   "poolName": "pool_name",
   "poolOwner": [
      {
      "ownerName": "wallet_name",
      "ownerWitness": "local"
      }
   ],
   "poolRewards": "wallet_name",
   "poolPledge": "100000000000",
   "poolCost": "340000000",
   "poolMargin": "0.01"
   "poolRelays": [
      {
      "relayType": "dns",
      "relayEntry": "relay.mypool.com",
      "relayPort": "3001"
      }
      {
      "relayType": "ip",
      "relayEntry": "x.x.x.x (ipv4 of relay)",
      "relayPort": "3002"
      }
   ],
   "poolMetaName": "This is my Pool",
   "poolMetaDescription": "This is the description of my Pool!",
   "poolMetaTicker": "POOL",
   "poolMetaHomepage": "https://mypool.com",
   "poolMetaUrl": "https://mypool.com/pool_name.metadata.json",
   "poolExtendedMetaUrl": "",
   "---": "--- DO NOT EDIT BELOW THIS LINE ---"
}
{
    "info": {
        "url_png_icon_64x64": "",
        "url_png_logo": "",
        "location": "",
        "social": {
            "twitter_handle": "",
            "telegram_handle": "",
            "facebook_handle": "",
            "youtube_handle": "",
            "twitch_handle": "",
            "discord_handle": "",
            "github_handle": ""
        },
        "company": {
            "name": "",
            "city": "",
            "country": ""
                    },
        "about": {
            "me": "",
            "server": "",
	    "company": ""
        },
    "my-pool-ids": {
        "0": ""
    },
    "when-satured-then-recommend": {
        "0": ""
    }
    }

}
Now run 05a_genStakepoolCert.sh pool_name again. This will generate the pool_name.pool.cert file and the actual pool_name.metadata.json.
Later you can upload the metadata.json to the URL you specified in the previous step. Do not edit it anymore or the hash won't fit!
If you want to change something, change it in the pool_name.pool.json and run 05a_genStakepoolCert.sh pool_name again.
Delegate to your own pool as owner. (Pledge)
- offline
05b_genDelegationCert.sh pool_name wallet_name
Generate the stakepool registration transaction. The script also attaches the new pool_name.metadata.json to the offline transfer file.
- offline
05c_regStakepoolCert.sh pool_name wallet_name.payment
Now attach the files needed by the core.
- offline
01_workOffline.sh attach pool_name.vrf.skey
01_workOffline.sh attach pool_name.kes-xxx.skey
01_workOffline.sh attach pool_name.node-xxx.opcert
You are done with the offline part. Unmount and bring your USB drive to the core again.
- core
01_workOffline.sh extract
For convenience rename the core files so you don't have to change the startup script every KES rotation.
- core
mv pool_name.kes-xxx.skey kes.skey
mv pool_name.vrf.skey vrf.skey
mv pool_name.node-xxx.opcert node.cert
Now change the startup script and add the three files.
- core
nano $HOME/.local/bin/cardano-service
#!/bin/bash
. /home/ada/.adaenv

TOPOLOGY=${NODE_FILES}/${NODE_CONFIG}-topology.json
DB_PATH=${NODE_HOME}/db
CONFIG=${NODE_FILES}/${NODE_CONFIG}-config.json
KES=${NODE_HOME}/kes.skey
VRF=${NODE_HOME}/vrf.skey
CERT=${NODE_HOME}/node.cert
cardano-node +RTS -N4 --disable-delayed-os-memory-return -RTS run \
  --topology ${TOPOLOGY} \
  --database-path ${DB_PATH} \
  --socket-path ${CARDANO_NODE_SOCKET_PATH} \
  --port ${NODE_PORT} \
  --config ${CONFIG} \
  --shelley-kes-key ${KES} \
  --shelley-vrf-key ${VRF} \
  --shelley-operational-certificate ${CERT}
Restart the service.
- core
cardano-service restart
While your core is starting you can transfer the pool_name.metadata.json to your local machine and upload it to the prepared URL.
Do the same with the extended metadata and your logos, if you have made them.
Check the status of the core. When it's up again you can submit the transactions. First the staking key registration, then repeat the same command for the stake pool registration.
- core
01_workOffline.sh execute
Confirm successful registration
pool.vet
pool.vet is a website for pool operators to check the validity of their stake pools on chain data. You can check this site Pool.vet for problems and clues as to how to fix them.
adapools.org
You should create an account and claim your pool here at adapools.org.
pooltool.io
You should also create an account and claim your pool here on pooltool.io.
Rotate KES keys
Make sure to rotate your KES keys and node certificate before! they expire.
Before starting check timedatectl on your offline machine and adjust, if needed.
Create the new KES keypair. You will notice that the counter increments automatically.
- offline
04c_genKESKeys.sh pool_name
Create a new operational certificate.
- offline
04d_genNodeOpCert.sh pool_name
Now attach the new files.
- offline
01_workOffline.sh attach pool_name.vrf.skey
01_workOffline.sh attach pool_name.kes-xxx.skey
01_workOffline.sh attach pool_name.node-xxx.opcert
Unmount and bring the USB drive to the core. Stop the node and extract the files.
- core
cardano-service stop
01_workOffline.sh extract
Now rename/move them to match the startup script. Then start again. That's it.
- core
mv pool_name.kes-xxx.skey kes.skey
mv pool_name.vrf.skey vrf.skey
mv pool_name.node-xxx.opcert node.cert
cardano-service start
Update pool registration
First get up-to-date information from the core via your USB drive.
- core
01_workOffline.sh add wallet_name.payment
Switch to the offline machine and edit the values you want to change in the pool_name.pool.json.
- offline
chmod 600 pool_name.pool.json
nano pool_name.pool.json
chmod 400 pool_name.pool.json
Create a new certificate pool_name.pool.cert and pool_name.metadata.json.
- offline
05a_genStakepoolCert.sh pool_name
Create the registration transaction. If the metadata didn't change you don't need to attach it to the transfer file.
- offline
05c_regStakepoolCert.sh pool_name wallet_name.payment
Now switch to the core.
First, if you changed the metadata, 01_workOffline.sh extract and upload it.
Otherwise skip this step and submit the transaction directly.
- core
01_workOffline.sh execute
Claim rewards
First get up-to-date information from the core via your USB drive.
- core
01_workOffline.sh add wallet_name.payment
01_workOffline.sh add wallet_name.staking
Switch over to the offline machine.
- offline
01_claimRewards.sh wallet_name.staking wallet_name.payment
Back to the core.
- core
01_workOffline.sh execute
Send a simple transaction
First get up-to-date information from the core via your USB drive.
Create a other_wallet.payment.addr which contains the address (and only the address) you want to send your ADA to.
- core
01_workOffline.sh add wallet_name.payment
01_workOffline.sh attach other_wallet.payment.addr
Bring everything over to the cold machine and create the transaction. This will send 1000 ADA from your pledge wallet to the other wallet. (Again everything in lovelaces. 1 ADA = 1000000 lovelace)
- offline
01_workOffline.sh extract
01_sendLovelaces.sh wallet_name.payment other_wallet.payment 1000000000
Make sure to meet your pledge at any time. And some ADA for transactions fees on top aren't bad.
USB transfer and submitting at your core.
- core
01_workOffline.sh execute